Tuesday, January 16, 2018

Snowman Pancakes - Simple and Fun!

photo: Non-Foodie Foodie

Over the summer we traveled the Ohio River Valley visiting family. One of our stops was to visit my Aunt Cathy and Uncle Brian. They have 2 grown boys (I mean like 6 foot plus grown boys) so they were excited to have babies back in her house - my 3 year old niece and nephew and my Shorty. My Aunt Cathy broke out her big fry pan and made the most amazing shaped pancakes.  They made the kiddies go crazy. This truly inspired me!

Since then I've been trying to make my pancakes a bit more interesting. I've got Mickey Mouse's head down pretty good. Then I came across The 17 Ways To Live (really live) in January from Paper & Glam.

Paper & Glam Blogger, Lisamarie, has put these wonderfully seasonal lists together to give, basically, a bucket list of seasonal fun, but done monthly and available to you as a printable download for free (see link above).

photo via @paperandglam's Instagram

One of Paper & Glam's January items is to celebrate this cold month with Snowman Pancakes. After a quick search through Pinterest to get some ideas, I had what I wanted to do.

I made this as simple as I could. I used pancake mix (my favorite is always Hungry Jack Extra Light and Fluffy). This one above had the head made first then the body (one small circle then one big circle made with a spoon). The toughest part of the whole thing is flipping it over. I suggest make the pancake to match at least 3/4 of the spatula size.

I friend up bacon in full strips in my new FAVORITE appliance - the Air Fryer. The bacon lies across the "neck" to make a scarf.  Next add chocolate chips for the eyes and the buttons, and voila`!  You have a cute and yummy snowman.

My co-chef wanted to have one "with hair".

photo: Non-Foodie Foodie

For this one, I started with the body then added a smaller circle for the head. I took a baby spoon and made two small pig tails on either side.

Once it was cooked, I added butter (very hard to do after the chocolate chips are added), a bacon scarf, and let Erin add the eyes and buttons. She wanted a mouth and a bow, all added with chocolate chips.

Once you take a picture of your SUPER cute creation (#latergram) - smother in syrup (if that's your thing) and enjoy!! 

I also consider this one a Pinterest Win!  It pretty much looks like (or even a little better, but I'm biased) than the ones I got inspiration from.

With this success, this weekend we are going to try Snowman Pizza, also on Paper & Glam's January list.

This post contains links, but at the time of writing this post, there is no affiliate program I am subscribed to.

Wednesday, May 20, 2015

Indoor S'mores Bars

Now that I'm a mom - it's opens a whole new world of food and food prep for me.  When looking to make something Munchkin can help me with, there are different things to think about - what can she help me make that won't make her sick if she eats a little before it's done?  What can we make that can have some margin of error for the amount that will end up on the floor?  What doesn't need a lot of knife work, heat or patience (on both our parts)?

Now, Munchkin is just turning ONE this month (OMG!!).  She isn't really helping me yet, but I came across this recipe as something to make as a give away for her birthday party.  It's a beautiful layered jar mix.  As I was testing it for yummy-ness (as not all jar mixes are as awesome in taste and they are in look in the jar) I found it was the perfect kid recipe!  Simple ingredients - check!  Nothing raw - check!  Easy for little hands - check (she can even use her hands to mix when she is dexterous enough)!  Nothing really hot (except a little time in the oven) and no real knife work - check check!!

...AND it's super yummy to boot!

I made 4 batches of this in one night for an event at work (I got 60+ bars) and hardly broke a sweat.  Even better - you probably already have everything in your pantry.


Indoor S'mores Bars

1½ cups graham crackers cut into 1" pieces (I used teddy grahams to look festive and avoid chopping)
1½ cups mini marshmallows
¾ cup chocolate chips
½ cup plain granola (I've used vanilla bean and honey so far)
½ cup packed light brown sugar
8 Tbsp butter - melted and cooled a little
 
Preheat oven to 350-degrees. 
 
Mix all ingredients with a bowl until all pieces are gleaming with buttery goodness.  Spread in an 8x8 baking pan, making sure to pat down the graham crackers that are sticking up a bit.  Bake for 12-15 minutes.
 
Cool completely before cutting.
 
One batch makes 16 bars.

To make as a give away - layer all ingredients except butter in order listed (graham cracker on bottom and brown sugar on top) into a quart size mason jar.  Print directions and attach to jar.
 
Almost all packaged for party goodies -
just need to add tags and directions!
 

Wednesday, May 6, 2015

A lot of LIFE was happening all at once

So... 2014 was busy year. It was full of extremes to say the least. Let me start at the beginning.

I got the best news of my life in August of 2013 - my husband and I were expecting!! We had been trying for a while and had finally been blessed with this new life and truly starting a family.
This amazing news was followed by the worst news of my life just that December - my father was diagnosed with stage 4 Pancreatic Cancer.

2014 then started bitter sweet. We had found out during the holidays that we were having a girl. So much to plan and so much unknown to just let happen.

In January, the chemo started and the wills were updated. We didn't know what lie ahead but Mom and Dad wanted to be prepared when what ever was going to happen happened.

In February, my sister was blessed also with not just one, but two babies due just a few months after our new baby girl.

March was full of shower celebrations for me and my husband. Family and friends came from near and far to celebrate my shower and St Patrick's Day with us.

April was hectic with preparation both at home and at work. My father was also trying a new chemotherapy regimen and it was working and letting him grow back his beautiful white hair. It may seem insignificant but it was always his favorite feature.

May, well, it was the longest month of my life and the most important month of my life. Our beautiful baby girl was born (2 1/2 weeks late). Erin now was the center of our world.

June and July were a blur - we actually got sleep but it just flew by. There were a lot of firsts. First smile, first doctors visit, first time meeting family, first trip out of the house, first BBQ. It was a beautiful summer and we tried to make sure we didn't keep ourselves away.

In August, my sister and her husband were blessed with beautiful twins - a boy and a girl. They were tiny and needed a little extra care, but were perfect in every way.

September was my first full month back to work. Catching up and trying a figure out my new life balance. (Still working on that!).

As October came around, we wanted to make sure to include my dad (who at this time was going on 10 months since his diagnosis and was still pretty active) in as many first as we could do. We went to the pumpkin patch, picked apples and ticketed off as many fall bucket list items as we could.

November was full of plans. I wanted to have the best Holiday season ever - for Erin and for my dad. We had close family fiends come up for Thanksgiving. There were 4 babies in the house for the whole weekend and my dad said he'd never felt better. So many family memories.

December was again bitter sweet. It was fast and hectic like most are. Christmas was full of toys and baby clothes and lots of firsts again, but this time it was first tooth, first movement crawling, first semi words.

Just as the New Year was ringing in a tired voice from my dad let us know that he was not...

In January 2015, my father lost his battle with cancer, surrounded by his wife and daughters.

Why am I sharing this, you ask? Because I need to. It's not a recipe and it has nothing to do with food, but the events of 2014 have changed my life more than any other year in my whole life. I think it was said best to my sister that "a lot of LIFE was happening all at once."

I am now someone different than I was in 2013 (even if just a little) and this blog is a reflection of me - my likes and interests. I'm not sure how I have changed and hope you will continue to follow me in that journey.

Wednesday, December 4, 2013

Leave of Absense

Hello all,

I wanted to thank you for continuing to come back to my blog and support me.  I also want to apologize for not having any new content up since last April.

Looking back at 2013, I am actually pretty excited and super sad to have it come to a close.  There were some wonderful times including a beautiful wedding and two wonderful babies entering into the lives of my closest friends.  There were also sad and stressful times both in my personal life and in my professional life.

2014 is primed and ready for true life changes and a new adventure around every corner.  I can't share yet, but I know you will hear soon enough!

So... Again... Thank you for coming to see me and I promise new goodies in the new year.  I have a challenge I never completed (52 cookbooks in 52 weeks) and lots of new cookbooks to try!

Happy Holidays to All!


Friday, April 5, 2013

Cookbook Challenge #7 - The Irish Pub Cookbook

It’s now three weeks PAST St. Patrick’s Day, but I feel that any day is good for a cheesecake, especially a boozy Bailey’s and Guinness cheesecake!

For St. Patrick’s Day, we do a gathering at our house.  It’s the second largest to Christmas for us.  My staple dessert is my St. Patrick’s Day Cake (a Guinness Cake base, with Jameson Irish Whiskey buttercream and Bailey’s Irish Cream Chocolate Ganache).  It’s amazing, but I always like to make something else to go with.  It changes each year.  Last year it was Guinness floats (do you think we like Guinness or what?) and this year I wanted to try the Bailey’s Irish Cream and Murphy’s Stout cheesecake in my challenge cookbook, The Irish Pub Cookbook by Margaret M. Johnson and Leigh Beisch.


Since I actually don’t cook a lot outside of food gatherings with friends and family (yeah, weird, I know), I am usually trying out a recipe I’ve never made before on a group of people.  I have a steadfast policy that if whatever I’m trying doesn’t work, we can always order pizza!  In the case of dessert, we can always go grab ice cream!

In all my years of testing new recipes on unsuspecting guests, I have never had to go to plan B.  This recipe is the first that almost sent me out to the corner store for ice cream.  First, I couldn’t find my springform pan.  I searched high and low (of course it was the morning of the party) and... nothing!  I finally pulled out my tart pan and decided it was just going to be a very shallow cheesecake.  This was actually a blessing in disguise.  I made the crust according to the instructions and then started to make the no-bake cheesecake.  The instructions said to cook the stout and brown sugar for 8-10 minutes or until it became syrupy and coated the back of the spoon.  Thirty-five minutes later, the stout was still as thin as when I put it into the pan and only reduced by a third.  I gave up, afraid of burning the mixture, and just kept going with the recipe.  I mixed in the rest of the ingredients, poured what fit into the pan (only a third of the total mixture if that much) and put it all in the fridge to set for the 3-5 hours.

Six hours later, the tart was just firm enough to cut, but once it was plated, it started to spread.  It was super creamy and VERY strong with the taste of the Bailey’s, but it was NOT a cheesecake.  I think the only reason it set as much as it did was because it was only an inch thick.

In talking with my sister-in-law who has to reduce stout and brown sugar for one of her recipes for cookies, she told me that she has to cook the stout and sugar mixture for at least 45 minutes to get it to become a syrup.  Did they not test the recipe before they printed it?  I think information like that is sort of important.

So, a week later, I still had the other 2/3 of the cheesecake mixture in my fridge.  It has not set any more than in the additional 168 hours in the fridge.  Inspired by my recent Jamie Oliver class, I decided to make a cheesecake parfait out of it.  With a little extra whipped cream and another batch of the crust, I came up with an excellent (and still strong) no bake cheesecake cup.  Here is the recipe with the adaptations to make the cups.


 Bailey’s Irish Cream and Guinness No-Bake Cheesecake Cups

2 cups digestive cookie crumbs (smash about 16-18 biscuits)
6 tablespoons butter, melted
4 cups Guinness Irish Stout
2 cups dark brown sugar
8 ounces cream cheese (one package), room temperature
1 cup powdered sugar, sifted
4 cups cups heavy cream, divided in 2
3/4 cup Bailey’s Irish Cream liqueur
1/4 ounce unflavored gelatin (one packet)
1 cup boiling water

In a small bowl, mix melted butter and digestive cookie crumbs until they feel like wet sand.  Take a spoon and divide evenly among 12-16 eight-ounce containers (depending on how many you are serving).  Mash down bread crumbs with the back of a spoon or the end of a muddler to make a solid bottom.  Refrigerate until ready to fill.

In a saucepan, combine Guinness and brown sugar.  Bring to a slow boil and reduce heat, stirring occasionally to prevent it from burning.  Cook for 35-40 minutes, or until the mixture has reduced by about a third and has a slightly thicker consistency.  Remove from heat and let cool completely.*

In a small bowl, combine boiling water and gelatin.  Stir until the gelatin is completely dissolved (about 5 minutes).   

In a large bowl, mix cream cheese and powdered sugar with an electric mixer until smooth.  Add 2 cups of heavy cream and beat until incorporated (3-4 minutes).  Stir in 1/2 the remaining cooled Guinness syrup and all the Bailey’s.  

Add 2 tablespoons of the Guinness syrup to the gelatin mixture, then add to the cream cheese mixture and mix to combine.  Let cheesecake mixture set in refrigerator for 2-3 hours.

Remove cheesecake mixture from refrigerator.  In a large bowl, whip 2 cups heavy cream until stiff peaks form.  Add whipped cream to the cheesecake mixture and carefully fold to combine.  Divide evenly among 8-ounce cups with crumb base.  Return to the refrigerator to set 2 hours to overnight.

To serve, you can crumble a couple more digestive cookies and maybe add a mint leaf for a touch of green.

* NOTE FROM THE COOK - Do NOT put the Bailey’s into the hot stout and sugar mixture.  I did and it curdled immediately!  I had to throw out the batch and use the remainder of the stout and sugar mixture to make the rest.  If you do not make the horrible mistake I did, you will have 1/2 of the stout and sugar mixture left.  Keep refrigerated and use it to make another batch later, or try reducing it further on the stove top to make a syrup.  Good luck!

Serves 12-16


#52cookbooks

Monday, April 1, 2013

Food Penpal for March 2013

When I was a teenager, I had a plethora of penpals.  I wrote every day with friends and acquaintance all over the United States and even the world.  My main topic of conversation was The New Kids on the Block and other pop music icons of the late 80's and early 90's.

I spent hours writing letters about my Boston fab five were.  My penpals and I exchanged tokens like pins, questionnaires and copies of radio recordings.  For instance I would tap an interview off a New York City station in exchange for a Los Angeles interview.

Now in my late-thirties and far from my fab five days (though I can't wait to see them again this summer in Brooklyn!!) I find myself with new and more mature penpals - Foodie Penpals!!!

In 2011, Lindsay, a dietitian and blog writer (http://www.theleangreenbean.com/), decided to start a food exchange and it's now grown to over 1,000 participants in the US, Canada and UK.  Anyone can be part, blogger or not.  The idea was so fantastic, I just had to sign up! 

This is technically the second time I've signed up for the exchange.  This month, my foodie penpal, Cassidi, sent to me a wonderful box of goodies.


I got:
  • Boulder Canyon Red Wine Vinegar Potato Chips
  • Yummy Earth Organic Lollipops
  • Willamette Valley Vanilla Bean Granola Crisps
  • Ritter Sport Milk Chocolate with Cornflakes
  • A lovely note!
It was all amazing and I can't wait too see what April brings me!!

If you are interested in being part, click here to for details (http://www.theleangreenbean.com/foodie-penpals/).  It's fun, simple and you aren't suppose to spend any more than $15!!

#foodiepenpal

Friday, March 22, 2013

Cookbook Challenge #6 - Jamie Oliver’s Great Britain

My most recent challenge has a bit of a twist, a Jamie Oliver “twist”, that is!

Sur La Table is a high end national cookery supply store. They offer you everything from a $5 metal spatula to a $5,500 home coffee “center”. Along with their vast array of products, they offer classes
on all types of cooking, from entertaining to honing your knife skills to the finer points of cooking a soufflé. In short, think Williams-Sonoma meets Bed, Bath & Beyond and together, they have a classy love child who is dating Michael’s Arts & Crafts store.

Every once in awhile, I look over the listings at Sur La Table and other cooking schools and venues in the area to see if anything looks interesting. With this challenge I’ve given myself, there was a class that I just couldn’t pass up - “Great Food Inspired by Jamie Oliver”.


The class highlights recipes from Jamie Oliver’s Great Britain and takes you step by step to make a full meal in just about 2 hours. Here was the menu: Apple and Watercress Salad with Blue Cheese Dressing and Crushed Walnuts – Sizzling Lamb Lollipops – Crispy Roasted Fishcakes Wrapped in Bacon – Citrus Cheesecake Possets. And the kicker?  For the cost of the class you get a copy of the cookbook too!! How perfect is that? Never one to have fun alone if I could add a friend, I asked my sister to join me and we set off last Wednesday for a night of handmade British faire and maybe a new skill or two.

With cups of black tea in our hands and every kitchen instrument you could imagine at our fingertips, we set off to make the delectables on the menu. The class was amazing (see all my pictures below), the food was off the charts and the company was great. It was totally worth it and I can’t wait to sign up for the next one! Our instructor, Joel, said I could share with you my favorite recipe of the night, the Crispy Roasted Fishcakes Wrapped in Bacon.


Crispy Roasted Fishcakes Wrapped in Bacon

Preface from Jamie to the Sur La Table students: There are a few steps to make these fishcakes, but each step is dead easy and so worth it, because the end result just seems to make people happy (note from Heidi - H*ll’s yeah! And I’m not even a fish person, really). I think you have to accept that sometimes in life even something humble, like a fishcake, requires effort. The reaction to these fishcakes has been amazing, and interestingly, whenever homemade fishcakes are on a restaurant menu, they always sell. The difference with making your own is that you get flavors and texture suited to your own particular tastes. So I’ll happily give this recipe to you, knowing that a kid could make them... mine have, with a little help.

2 Small Leeks
A knob of butter*
1 whole nutmeg for grating
Kosher salt and freshly ground pepper
1 lb Yukon Gold potatoes
3 large free-range eggs
8 ounces smoked salmon, smoked trout or (even better!) a mixture of the two, roughly chopped**
2 fresh lemons
6 sprigs of fresh flat-leaf parsley picked and finely chopped
A few handfuls of all-purpose flour
6 slices of white bread, crusts removed
1 dried red chile
Olive oil
6 slices (rashers) of quality bacon
Watercress to serve

Heidi’s notes:
* Knob equals 2-3 Tablespoons, usually
** We used smoked white fish and it was very yummy!

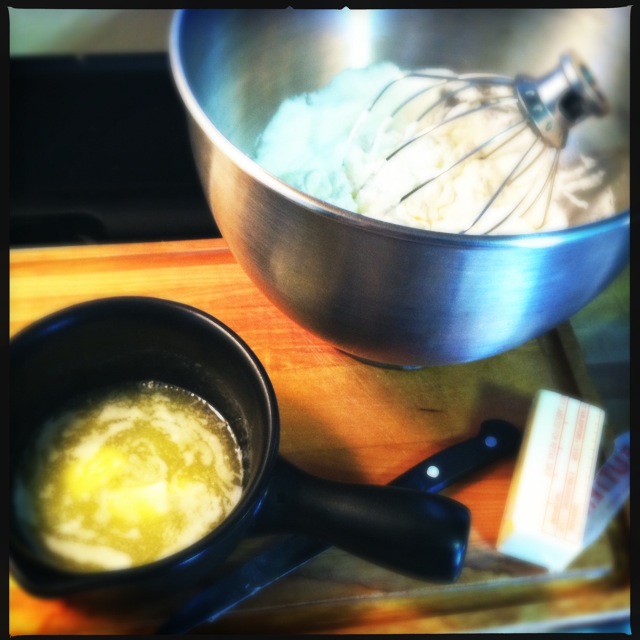
Top and tail the leeks, then peel back the tough outer green leaves. Cut them lengthways, wash under the tap and finely slice. Put them into a large pan on medium heat with a knob of butter and a few scrapings of nutmeg, and season with salt and pepper. Cook gently with the lid on for around 25 minutes, or until softened, then take the pan off the heat and leave to cook.

While your leeks are cooking, peel the potatoes, halve or quarter them depending on their size and whack them into a pan of salted boiling water for about 15 minutes, or until cooked through and mashable. Drain them, then return them to the saucepan, smash them up so the mixture is smooth but also has chunks, and put to one side to cool down a bit. Crack eggs into a wide, shallow bowl, then carefully remove one of the yolks and stir into the potato mixture, followed by the sweet leeks and smoked fish. Add the zest of 1 whole lemon and the juice of half, and two-thirds of the parsley. Leave to one side.

Whisk up the eggs remaining in the bowl and tip into a shallow dish. Put a few handfuls of flour on a plate. Pulse the bread and chile in a food processor with a tiny swig of olive oil until you have coarse breadcrumbs, then stir in the remaining parsley and tip the crumbs on to another plate. Divide your fishcake mix into 6 little balls. Dust each one in flour, shaking off the excess, then dip them into the egg until completely coated. Let the excess drip off, them move them to the tray of flavored breadcrumbs. Wash your hands, and spend a bit of time patting, shaping and hugging them into nice-looking patties around 3/4-inch thick. Cover and leave in the fridge until you’re ready to cook them.

Preheat the oven and a large baking sheet to 425-degrees, with an oven rack positioned towards the top.

Lay the bacon rashers out side by side on a board and lay a sheet of plastic wrap over them. Using a rolling pin or a wine bottle to roll and stretch the rashers out a little bit lengthways so they’re longer and thinner (sounds cheffy, but it’s dead simple). Wrap one rasher around the circumference of each fishcake and secure with a cocktail stick. Place the fishcakes on the hot baking sheet and roast in the oven for around 30 minutes, or until golden and crispy. Serve hot from the oven, with some lemony dressed watercress and a few wedges of lemon for squeezing over.

Make 6 cakes


 ******

Highlights from the rest of the class:

My sister, Heather, psyched to start the class.
 

First Course:  Apple and Watercress Salad with Blue Cheese Dressing and Crushed Walnuts


Second Course: Crispy Roasted Fishcakes Wrapped in Bacon (see above)

Third Course: Sizzling Lamb Lollipops

Our instructor, Joel, with Heather and I getting ready to lolli some lamb...
(wait, that doesn't sound right...)


Here are the ingredients for the lamb lollipops and the three "dips".
We had a nice looking workstation, didn't we?


Lamb chops marinaded and into the hot pan!


Our workstation-mates, Inhwa and Hyokon, with Heather getting instructions on how NOT to get hot oil on yourself when you put a lamb chop into a hot pan.

 
Lamb lollipops on a bed of rice seasoned with herbs de Provence with trhee dipping sauces, a homemade taziki, a spicy salsa and a nut mix of crushed pistachios and blanched almonds.


How good does that lamb lollipop look?


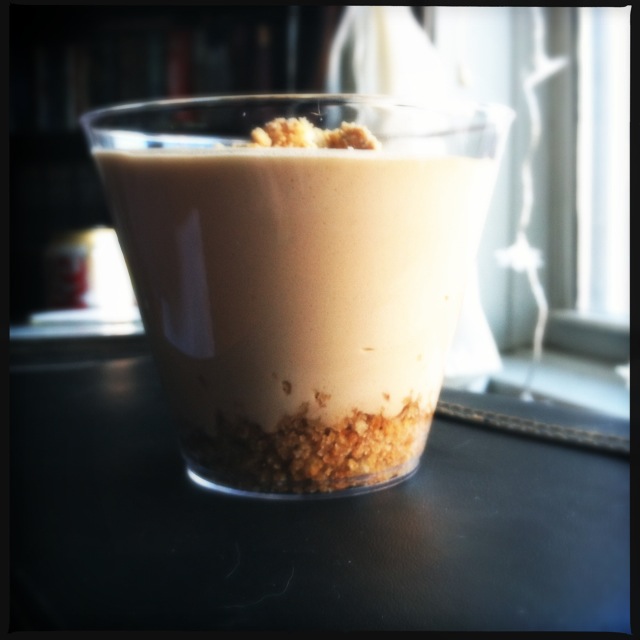
Pudding Course: Citrus Cheesecake Possets

It's a very decieving name, bordering on lying - as there is no cheese in this cheesecake!  The citrus thickens the cream to make a cheesecake like consistency.

Three hands make light work of juicing an orange and a lemon


Graham cracker and almond "crust" with the vanilla citrus cream on top


The best part - someone else cleans the kitchen for you!!!


If you think that a class at Sur La Table looks fun, you can see if there is a location near you and what classes they are offering by visiting http://www.surlatable.com/category/Web-Cooking-Root/Cooking-Classes

Our class was at the Hell's Kitchen location in New York City.

#52cookbooks
#surlatable

Friday, March 15, 2013

Nigella Lawson's Chocolate Guinness Cake for St. Patrick's Day

My husband is Irish-American. 100% Irish on both sides, so as you can imagine, Saint Patrick's Day is an official holiday in our house. Now, we aren't the green beer and pot of gold Irish, we are the corned beef and shepherd's pie dinner at home type. There must be good beer, of course, but we make sure it's Guinness and Smithwicks with a round of Irish Coffee and Bushmills for an aperitif.

Since I first picked up Nigella Lawson's Feast in 2004, I have been making the Chocolate Guinness Cake religiously in celebration of the Irish Saint’s holiday. My husband and I starting dating again in 2005 (a story for another time), but I have been an avid Guinness drinker since 1997. The glorious elixir which a friend of mine dubbed "steak in a can" has been my beer of choice since I first tasted it when I studied in London for a summer. Chocolate Guinness cake is the perfect combination of chocolate and malt without being too sweet. The addition of a tangy sour cream icing balances cake and stout.


Now, I could have left out the fact that I have made this before (If you were to pick up my copy of Feast, it would open itself to the Chocolate Guinness Cake page) and make this a cookbook challenge post, but I just couldn't lie to you. Try it and you will want to add this recipe to your annual to do list!

Chocolate Guinness Cake
Adapted from Feast by Nigella Lawson

2 cups flour
2 1/2 teaspoons baking soda
1 cup Guinness stout beer
1/2 cup plus 2 Tablespoons butter, cut into chunks
3/4 cup cocoa powder
2 cups sugar
3/4 cup sour cream
2 eggs
1 Tablespoon vanilla extract
1 batch Cream Cheese Icing (recipe below)

Preheat oven to 350 F. Grease 9" springform pan or grease and line the bottom of two 8" round pans with parchment paper.

In a medium bowl sift flour and baking soda together. Set aside.

In a large saucepan, mix butter and Guinness. Once butter is melted, whisk in sugar and cocoa powder. Turn off heat and set aside to cool slightly.

In a large bowl whisk together sour cream, eggs and vanilla. Whisk in cooled Guinness mixture. Slowly mix in flour mixture until everything is incorporated.

Pour into prepared pan(s). Bake for 45-60 minutes for the springform pan or 35-45 minutes for the two 8" pans or until a toothpick inserted into the center comes out clean. Do not over bake.

Cool completely. Ice with cream cheese icing (below) to look like a foaming stout pint of Guinness, pun intended.

Serves 10-12

Cream Cheese Icing
8 oz cream cheese, room temperature
1 1/4 cups powdered sugar, sifted
1/2 cup heavy cream

In a mixer, cream the cream cheese until smooth. Slowly add 1/2 powdered sugar then half the heavy cream. Mix until smooth. Add remaining powdered sugar and then heavy cream and continue to mix until smooth and spreadable.


As a side note, I have adapted the Guinness Cake recipe in more recent years by using Jameson Buttercream Icing and Bailey's Ganache instead of the cream-cheese icing to become what I have come to call St. Patrick's Day Cupcakes (also known as the Irish Car Bomb Cupcakes). But... I have to save something for St. Patrick's Day next year! 

#52cupcakes

Thursday, March 7, 2013

Cookbook Challenge #5 - Cakes Winning Recipes

This past weekend I hosted Ladies Night for the first time in my apartment. Ladies Night is a night once a month that the local ladies in my husbands family get together (sans kids and husbands) to eat appetizers, munch on desserts and chew on good conversation. Sometimes the cards come out or the quarters are pulled out for a fun game of Left, Right, Center.

We have been holding Ladies Nights as regularly as schedules allow for over 3 years. I previously lived just a little too far away to host at my house, but since I moved back to Queens, I've been close enough to host, but of course, it's taken me a year to do it.

Though I haven't hosted at my home to date, I am pretty regular in bringing a goodie or two. A the host for this month that doubled the pressure to make something yummy to share. With the help of my niece, who, much to her chagrin, is not old enough to be part yet, I made a few simple homemade goodies. We made fruit salsa with cinnamon chips my sister in law found on Pinterest (link) and, this week's cookbook challenge recipe, Blueberry Crumb Cake.

 Blueberry Crumb Cake
Adapted from Cakes Winning Recipes by Favorite Brand Name Recipe

2 cups flour
2/3 cup sugar
1 Tablespoon baking powder (yes, Tablespoon)
1 teaspoon salt
1/2 teaspoon baking soda
1 cup milk
1/2 cup butter (1 stick), melted
2 eggs, beaten
2 Tablespoons lemon juice*
2 cups fresh blueberries**
Crumb topping (see recipe below)

* to use fresh juice, use the juice of 1 lemon.
** 2 cups frozen blueberries (thawed and drained) can also be used.

Prepare crumb topping and set aside.

Pre-heat oven to 375 F. Grease 13" X 9" baking dish.

Sift flour, baking powder, salt, and baking powder into a large mixing bowl. Set aside.

In a medium bowl, whisk together butter, sugar, milk, eggs and lemon juice. Pour wet mixture into the dry and mix until combined, being careful not to over mix it.

Pour batter into the baking dish. Sprinkle blueberries over the batter then sprinkle crumb topping over blueberries.

Bake 40 to 45 minutes or until a toothpick inserted into the middle comes out clean. If there is still a little giggle to the batter, no worries. As long as the toothpick comes out clean the cake will set as it cools, making a nice sponge. Do not overbake.

Serves 12-16

I mixed my blueberries in, DON'T do that - they all fall to the bottom.    


Crumb Topping Recipe

1/2 cup flour
2/3 cup sugar
1/2 cup (1 stick) butter, softened
1/2 teaspoon cinnamon
1 cup walnuts, chopped (pecans can be used too)

In a medium bowl, combine all ingredients until mixture resembles coarse sand.

Excuse the blue color - that's my light in my kitchen.
#52cookbooks


Friday, March 1, 2013

Snack Works Recipe Rumble

It was another crazy Thursday in NYC. If you follow me on Instagram, you can see that I spent the day at a recipe contest.

The contest, called the Snack Works Recipe Rumble, was held at the Digitas, advertising agency that handles the account for the Mondelēz International Corporate (Snack Works parent company) and was open to agency employees and their friends. Thanks to my good friend, Cat, I was able to participate.

The rules of the contest were that you had to use at least two of the Snack Work products for an original recipe.  They would be judged and winners would walk away with a variety of prizes.  It sounded like so much fun, I just had to be part!

My recipe was for Premium Chocolate Toffee.  I didn't win, but I had a great time trying.  All the recipes were amazing and incredibly creative!  I'm so glad I got to be part of it.

I'm not going to share the recipe here (I'm going to link to it once it's on their website), but I would like to share some photos from yesterdays festivities.

I used four Snack Works products - Premium Saltine Crackers, Toberlone White, Green & Black's Organic Milk, and Milka Dark Chocolate Confections.

So, from this...


 ... to this!


 Simple, but this was my presentation for judging.


 This was Cat's submission - a wonderful orange, ginger, and chocolate biscuit. She served each judge a cup of STRONG coffee to complement the dense treat.


 All the recipe contestants were whittled down to 6 finalists.  During a final judging ceremony, Digitas set up a bar with three special drinks, each of which had to include a Snack Works product.

This was a Swedish Fish Martini - sweet & pretty much ALL Vodka.
 

This was a Whiskey Sour Patch Kid - sweet and tart with a bit of a burn, but in a good way.


 And the dessert of the drink world, a Chocolate Martini - cool and creamy with a kick.


Though we didn't win and prizes, after the party, there was nothing left but the porcelain.

#reciperumble

Friday, February 22, 2013

Cookbook Challenge #4 - Sandra Lee Semi-Homemade Cooking

This week, there was a bit of a delay in my post…but for good reason. We are spending the weekend in a rental apartment in Syracuse, NY. Everything was covered in a picturesque layer of snow and the moment we arrived, a welcoming flurry greeted us with a cool February smile.

Being away from home, I thought this would be a great opportunity to think outside my kitchen. I decided that the semi-homemade style of Sandra Lee was perfect for cooking in a kitchen I’ve never cooked in before and wasn’t even sure what supplies were there.
 
With a kitchen full of only pots, pans and salt and pepper, Sandra Lee’s Semi-Homemade Cooking cookbook is perfect for when you don’t have a pantry to pull from. Semi-Homemade cooking is described as 70% store-bought ingredients and 30% fresh-food to make foods that were prepared in minutes and taste like they were made completely from scratch. I found two recipes that made a hefty dinner – Curried Bow Tie Salad and Lemon Turkey Cutlets. And better yet, the only things I’m taking back home with me are my new containers of curry powder and dried onion flakes.
 
 Curried Bow Tie Salad

3/4 cup sour cream
2 teaspoons curry powder*
16 oz (2 small cans) pineapple chunks, drained
1 ripe avocado, peeled, pitted and cubed
1 medium red apple, cored and cubed
8 oz bowtie pasta/farfalle (about ½ a box)
Salt and pepper to taste

*Curry powder is not a hot curry. This made for a VERY mild curry – which is a great introduction to curry if you have not had it before, but we added extra to the leftovers and think it’s going to be much better when we have it for lunch today. If you want more curry taste – double it.

Follow instructions on box to prepare pasta to firm. Drain and rinse in cold water. Set aside.

In a large bowl, mix sour cream and curry powder to blend. Fold in avocado, pineapple, apples and pasta. Cover and refrigerate for a minimum of 15 minutes and up to 1 day.

After tasting, we felt this salad would be an excellent summer all-in-one salad if you add cooked and cubed chicken.

Serves 4 
 
 Lemon Turkey Cutlets

1-1 1/2 pounds boneless and skinless turkey cutlets
1/3 cup all purpose flour
1 egg, lightly beaten
Juice of 1 lemon (about 2 Tablespoons)
1/2 cup Italian style bread crumbs**
1 teaspoon dried onion flakes***
1/3 cup vegetable oil
Salt and pepper

** The recipe called for 2 Tablespoons finely chopped onion, but I thought that onion flakes would be a more economical choice for us this trip. Add more if you like more onion flavor. My hubby isn’t a big fan.

*** The recipe called for 1 cup of breadcrumbs, but as you can see in the pictures below, there was almost ALL of it left. I cut it in half for the recipe above, but I’m sure you can use 1/3 of a cup like the flour with no problem also.

Rinse cutlets with cold water and pat dry with paper towels. Salt and pepper each cutlet and set aside.

In a shallow bowl, put the flour. In another bowl, mix the egg and the lemon juice. In a third bowl, mix breadcrumbs with onion flakes.

Heat oil in a large skillet over medium-high heat. Working in batches, dip cutlet in flour then egg mixture, then into the breadcrumbs, making sure to cover all the meat and tap off the extra of each mixture before adding the meat to the next one. Place cutlet in hot oil and cook until brown, about 3 minutes per side. When done, take out cutlets and place on clean paper towels to soak up any excess oil.

Serves 4
 
before dipping

after dipping - looks like I didn't do anything

To make this a complete dinner, I made the salad first and while it was in the fridge, I had plenty of time to do the cutlets. They are not listed as 2 recipes that need to go together in the cookbook, but we found that they complimented each other very nicely.
 
An Irish Stout and a Diet Coke make it a dinner for two
 
*****
 
Some highlights from Syracuse and the Finger Lakes
 
Day 1 - Arriving and settling in - oh, and making dinner...
 
Having a coney dog (pronounced "coo-ney") from Heid's for lunch 
 
 
Day 2 - Beer and Cheese tastings in the Finger Lakes
 
3 Brother's Winery complex in Geneva, NY
We checked out War Horse!
Thanks Andrew for the Cincinnati - 1/2 lager, 1/2 root beer - YUM!! 
 
 
Amazing cheddars and more at Miranda Cheese Company
in Waterloo, NY 
 
 
 Tasting pint of a Amber Lager at Naked Dove Brewing Company
in Canandaigua, NY 

 
 And we found this in Geneva also - Red Jacket Orchards, an
Union Square Farmers Market staple. It's closing it's outlet for a bit
so we got some great deals. 
 

#52cookbooks

Snowman Pancakes - Simple and Fun!

photo: Non-Foodie Foodie Over the summer we traveled the Ohio River Valley visiting family. One of our stops was to visit my Aunt Cathy...